Purchase credit note
The purchase credit note is part of the purchase process as illustrated in the Purchasing overview.
On this page you will find the description of the purchase credit note workflow. You can also find more detailed information on the following topics:
- How to create a purchase credit note
- How to enter direct purchase credit note lines
- How to create purchase credit note lines from invoice and return lines
- How to manage dimensions
| Prerequisites | |
|---|---|
| Previous steps |
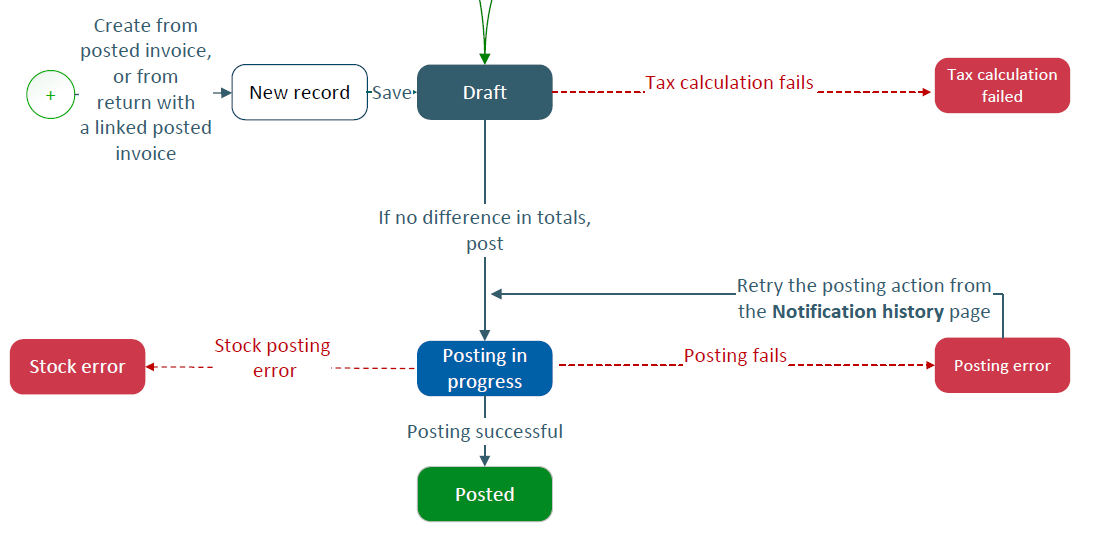
Purchase credit note workflow
This is an overview of the purchase credit note workflow.
- Create the purchase credit note.
- Add lines to the purchase credit note.
- Post the credit note.
Let's describe this flow in more detail.
-
Create a purchase credit note
When you create a purchase credit note, its status is Draft. After entering the header data and at least one line, you save the credit note.
A tax calculation automatically runs. If there is an error, the status changes to Tax calculation failed.
When you correct the tax details, the purchase credit note changes back to Draft. Once totals match, you can post the credit note.
- Post a purchase credit note
When you post a credit note and the financial system you are integrating with is waiting to respond, the purchase credit note status changes to Posting in progress.
-
When you post a credit note and there are stock posting errors, the status changes to Stock error. When you correct the stock details, you can try to post it again on the Notification history page.
-
When you post a credit note and the post fails, the purchase credit note status changes to Posting error. You can try to post it again on the Notification history page.
-
When you post a credit note and it successfully integrates with the relevant financial system, the purchase credit note status changes to Posted.
Create a credit note
There are 2 ways to create a credit note:
- From the Purchase invoice page
- From the Purchase credit note page
Purchase invoice page
Once you have posted a purchase invoice, the option to select Create credit note appears.
- Select a reason. The two main predefined reasons are a decrease or increase in quantity.
- Select a Supplier document date.
- Enter the Total credit note amount excl. VAT.
- Select OK.
Purchase credit note page
To create a purchase credit note directly, add the header details:
- Select a Financial site.
- Select a Bill-by supplier.
- If you have defined sequence numbers in the Sequence number page, the number generates automatically when you create the purchase credit note. If you did not define sequence numbers it generates automatically based on the default sequence number associated with the Purchase credit note page. You can also enter the number manually.
- Select a reason. The two main predefined reasons are a decrease or increase in quantity.
- Enter a Supplier credit note reference if required.
- The Supplier document date defaults to the current date, but you can change it to an earlier date.
- Enter the Total credit note amount excl. VAT.
- Select Save.
Send a purchase credit note for matching
Once the credit note is saved, select Send for matching to send an email to the buyer to notify them to match the supplier credit note against received items by searching against linked purchase invoices or purchase returns.
If a default buyer is set up, their email will be preselected. If not, you can select the buyer from a list.
Select Send.
You can then add lines to the credit note.
Add a line to your purchase credit note
You can create direct purchase credit note lines for non-stock items. You can also create purchase credit note lines from purchase invoice and purchase return lines.
There are 2 ways to create a direct purchase credit note line.
Perform a quick entry
- Select Add line on the Lines grid.
- Enter the Item name, the Item description, Purchase unit and Quantity.
- Tab to validate the information. The main details of the purchase credit note line display in the grid.
- Save.
Open the line panel to enter and update any detailed information about the line such as the details about the item name, item description, quantities and pricing.
Add a line with all the detailed information
- Select Add line in panel. The Add new line panel opens.
- Enter or select the Item name, the Item description, Purchase unit and Quantity.
- On the Price tab:
- Check that the Gross price populated from the supplier is correct. You can update it.
- You can enter a Discount percentage and Charge percentage.
- You can check the tax details. Refer to View and manage tax details.
- On the Line notes tab, you can add internal notes. See Add notes.
- To validate your entry and display the line in the purchase credit note list of items, select Apply. To validate your entry and create a new line, select Apply and add new.
- Save.
Add lines by linking to a purchase invoice or purchase return
To link a purchase credit note to a purchase invoice or return you need to perform the following actions.
Create a full credit note:
- Add a Financial site and Bill-by supplier that match a purchase receipt, then select Add lines from invoices or Add lines from returns.
- Search for the relevant invoice or return using any of the Purchase receipt, Purchase return, Purchase invoice and Item filters, and select Search.
- Select the relevant invoice or return and select the checkbox.
- The quantity to credit will default to the full amount.
- If the Credit note unit price has changed since the time of purchase, you can amend it.
- Select Add. The purchase credit note status is Draft.
Create a partial credit note:
- Add a Financial site and Bill-by supplier that match a purchase receipt, then select Add lines from invoices or Add lines from returns.
- Search for the relevant invoice or return using any of the Purchase receipt, Purchase return, Purchase invoice and Item filters, and select Search.
- Select the relevant invoice or return and select the chevron to view the returned and invoiced items.
- Enter the quantity to credit.
- Select Continue at the warning message.
- The Credit note unit price resets to zero. Update it to the correct price at the time of invoicing or returning.
- Select the relevant invoice or return, then select Add.
- The purchase credit note status is Draft.
Assign the dimensions
You have two options to open the Dimensions window and assign dimensions: You can assign dimensions to a line or assign dimensions to several lines.
- You can assign dimensions when you create the line: In the add new line panel, from the More actions icon, select Dimensions.
- You can assign dimensions to an existing line. From the More actions icon on the line, select Dimensions.
The Dimensions window displays the dimension types defined for your company.
- You can select a dimension for each dimension type.
- Select OK.
- From the More actions icon, select the Set default dimensions icon. The Dimensions window displays the dimension types defined for your company.
- You can select a dimension for each dimension type.
-
To assign the selected dimensions to all existing lines that do not yet have dimensions assigned, select Apply to all lines.
To assign the selected dimensions as default values for future lines, select Apply to new lines only from the More actions icon.
- Dimensions are managed in the Dimension page.
- Dimension types are managed in the Dimension type page.
Manage dimensions
Purchase credit note lines can inherit dimensions and attributes from the site, supplier, item or from all 3. For this, dimensions and attributes need to be set on the site, supplier or item record, and default dimension rules need to be set on the company record, on the Dimensions tab. When you create a purchase credit note, the dimensions default on the lines to those defined for the site, supplier, item or for all 3.
If default dimension rules are not set for the company, you can add dimensions directly on the credit note lines. You can add and change dimensions on each line individually. Or you can add or change the dimensions for all lines.
To manage dimensions for individual lines:
- From the More actions icon on the line, select Dimensions.
- Select the dimensions you want for the line.
- Save.
To manage dimensions for all lines:
- From the More actions menu at record level, select Set dimensions.
- Select the necessary dimensions.
- Select Apply to all lines to apply the dimensions to all the existing and future lines or Apply to new lines only to apply the dimensions to future lines only.
View and manage tax details
Tax management, tax determination and tax calculation depend on rules managed by the tax engine used. It can be the generic tax calculation engine using the internal calculation method, or an external tax engine such as Avalara AvaTax.
This tax engine is defined in the setup for the company associated with the purchase site. It triggers automatically to calculate and determine all the tax details. The determination of tax details is based on information such as: Country and region of the supplier address, country or region of the purchasing address, item tax group and tax date.
- If you use the internal tax engine, tax amounts automatically calculate and update when you create or edit a line.
- If you use an external tax engine, tax amounts update when you save the purchase receipt creation or update.
When the Not done tax calculation status displays on the General tab, it means the tax calculation has not yet been done by the tax engine and the tax details are not up to date.
When the Failed tax calculation status displays on the General tab and on a line, it means that an error occurred during the tax calculation process or some tax information such as the tax code is missing. You need to manually enter this information in the Taxes panel associated with the line.
To display and manage the tax details, select Tax details from the More actions icon. You can also select the Open Line Panel icon, go to the Price tab and select Tax details.
When you create a purchase credit note from the Purchase invoice page, the tax details flow through to the credit note. These include the Total excluding VAT, Total VAT and the Total including VAT. The same operation occurs if you create a purchase credit note by interacting with Add lines from returns or Add lines from invoices on the Purchase credit note page.
Select Tax details on the line to view the tax rate applied to the purchase receipt and details of how the VAT amounts are calculated. You can also change the tax by searching within the Tax field and selecting a different tax rate, this will update the Tax rate and amounts.
Select the Totals tab on the purchase receipt to get a summary of the tax details across all lines for the purchase receipt.
When your purchase receipt has different currencies for the Supplier and Receiving site, 2 additional fields populate on the Price tab on the line and the Totals tab on the purchase credit note. The Total excluding VAT company currency and Total including VAT company currency display the tax amounts in the currency of the Receiving site.
Add notes
You can add internal notes to a purchase credit note at the document or line level, or both.
Internal notes are notes you want to share with your colleagues. Customers never see these notes. These are for internal purposes only.
Add notes at document level
You can add notes at the document level from the Notes tab.
Add notes at line level
You can add notes for a line from the Line notes tab of the line detail panel.
Post a purchase credit note
You can post your credit note when the following conditions are met.
You need to:
- Enter the header information.
- Add at least one line item.
- Ensure the credit note totals on the header each equals the sum of the corresponding credit note totals on the lines.
Once the above conditions are met, select Post. The purchase credit note status is Posting in progress, and once the financial system you are integrating with responds, it is Posted.